
Thanksgiving Tips & Recipes
Ah, yes, delicious holidays meals are fast approaching and we would enjoy catering your Thanksgiving or Holiday meal for you. However, if you are the chef this year we are happy to share some cooking tips and recipes. Thanksgiving is all about good food, and as a chef, I receive lots of questions from clients and friends regarding what it takes to perfectly cook the trifecta of the “Perfect Thanksgiving” traditional meal – turkey, mashed potatoes, and gravy. And of course, a Thanksgiving meal must include cranberry relish for which I have included a recipe. For those of you who refuse to serve the green bean casserole of the 70’s and 80’s, you’ll find an alternative here! And lastly, a decorative dining table and/or buffet table sets the tone. You’ll find a recipe for making a bread cornucopia, sure to impress. your guests!
Of course, Creations in Cuisine Catering would be happy to cater your Thanksgiving meal, but if you insist on being the Chef this year here are my tips:
Chef Tony
Frequent questions regarding 3 Thanksgiving cooking basics:
- How to cook a fresh turkey that is moist and flavorful
- How to prepare the very best mashed potatoes with just the right consistency and flavor
- How to make the perfect Thanksgiving turkey gravy
The Perfect Thanksgiving Turkey
Some tasty Thanksgiving turkey tips – it all comes down to stuffing, seasoning, temperature, and time:
- A turkey will cook more evenly if it is not densely stuffed. Rather than placing stuffing in the cavity of the bird, loosely place aromatic vegetables such as carrots, celery, and onion, or garlic in the cavity.
- For added flavor carefully tuck fresh herbs under the skin of the breast.
- Be sure to season the turkey with salt and pepper.
- Cook your favorite stuffing separately in a heavy casserole dish.
The Perfect Thanksgiving Mashed Potatoes
When it comes to preparing mashed potatoes…
- Be sure to select the right potato…
- Russets are perfect for mashing as they are light on moisture and heavy on starch. The result will be fluffy and light potatoes when whipped.
- Yukon gold potatoes have a natural buttery flavor and enough starch to also whip up fluffy.
- Red potatoes, however, have less starch and do not whip up well but do absorb flavors more easily when moist.
- Always salt your water when boiling potatoes. To boil potatoes evenly – always select potatoes that are close to the same size, and be sure boil them peeled and whole.
- Once your potatoes are cooked to perfection, a ricer is the best tool to use for a smooth consistency. Never use a blender or food processor to make mashed potatoes as that will make them flat and sticky as opposed to light and fluffy. A hand masher or a mixer on low speed is also a good option.
- Preheat the cream, butter or milk before adding to the potatoes. This will keep the potatoes hot and not have the need to reheat before serving Thanksgiving dinner.
- Whipping in a small amount of a quality olive oil will add a unique flavor and also help to keep the potatoes fluffy.
The Perfect Thanksgiving Turkey Gravy
Authentically Made Thanksgiving Turkey Gravy seems to be the biggest challenge of Thanksgiving…
- Use the neck and giblets to add flavor. Brown the neck and gizzards in a little oil to add color then cover with stock and simmer while the turkey is cooking. Chop up the giblets for a chunky gravy if desired.
- When the turkey is done pour off the pan drippings, remove the grease and add to the simmering stock. Add a small amount of the hot stock to the roasting pan and scrape the bottom with a wooden spoon.
- It is important that the grease or fat is removed from the stock or cooking liquid, but don’t discard! Use it to make the roux to thicken the gravy. Add the fat to a heavy bottom saucepan and add hot liquid to the flour and fat mixture (roux) and whip to remove all lumps. Cook to reduce and thicken and to cook out the flour flavor. Strain and serve.
The finished product will be authentically made, browned, and aromatic turkey gravy!
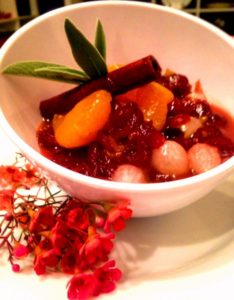
Holiday Cranberry & Orange Relish Recipe
The bright, crisp, but not too sweet flavor of this Cranberry & Orange Relish Recipe is ideal with turkey and trimmings. Why not try out this holiday relish recipe for a fresh citrus twist from traditional cranberry sauce?
Yields 1.5 Pints (enough for leftovers)
 Recipe Ingredients:
- 2 Cups Dried Cranberries
- 2 Cups Hot Water
- 4 Ounces & 2 Tbsp. Triple Sec Liqueur
- 2 Cups Orange Juice
- 1 Cinnamon Stick
- 2 Tbsp. Brown Sugar
- 1 Tbsp. Canola Oil
- 4 Ounce White Pearl Onion
- 1 Tsp Arrowroot
- 2 Tsp Water
- 11 Ounce Mandarin Orange Segments
Preparation:
- Rinse Cranberries in cool water, drain well. Transfer to a container and cover with hot water. Allow to soak and reconstitute in water for 20 – 30 minutes.
- In a heavy bottom saucepan add the Orange Juice, Triple Sec, Cinnamon Stick and Brown Sugar. Bring mixture to a boil and simmer for at least 5 – 10 minutes until reduced and slightly thickened, hold.
- Heat a 9″ sauté pan on a medium flame, add Canola Oil. When hot add the Pearl Onion and sauté until heated through and slightly tender.
- Drain Cranberries, discard liquid. Add Cranberries to the sauté pan with the Onions. Sauté until heated through. Deglaze pan with the remaining 2 Tbsps. of Triple Sec.
- Add reduced Orange Juice, Brown Sugar and Cinnamon Stick liquid to the Onions and Cranberries. Reduce to a low simmer for about 5 minutes.
- Dissolve Arrowroot in 2 Tsp. Water. Stir Arrowroot mixture into simmering Cranberries, mix well and continue to simmer for another 3 -4 minutes. Making sure it does not burn or reduce too quickly. Remove from heat and hold.
- Drain Orange Segments of all liquid. Gently fold into Cranberries. Serve warm or allow to cool.
The Alternative to the Green Bean Casserole
Thanksgiving is a day of tradition and that includes how the turkey is prepared and what side dishes are served. Not too keen on the green bean casserole dish prepared with cream of mushroom soup? Today’s version of the green bean casserole is fresh beans slightly steamed and tossed with a shallot butter. (saute’ one shallot in 3 tbs. of butter per pound of beans). The trendy vegetable these days is, of course, Brussel Sprouts. We suggest roasting them in a 350-degree oven. First, wash and rinse Brussel sprouts. Cut in half, toss with olive oil, sprinkle with kosher salt, and roast in a 350-degree oven for 20 minutes. Another alternative is our version of a spinach, artichoke side dish that can also be served as a dip and you will find the recipe below.
Spinach, Artichoke, Muenster Casserole
Ingredients:
- 1 tbsp. Olive Oil
- ¼ Med.Yellow Onion, diced
- 1 tbsp. Fresh Garlic, finely diced
- 7 oz. Artichoke hearts, thinly sliced
- 1 pintHeavy cream
- ¼ lb. Muenster Cheese, shredded
- Juice of 1 lemon
- 6 oz. Frozen spinach, drained, rough chop
- Kosher salt to taste
- White pepper to taste
Preparation:
In a heavy saucepan heat olive oil, add onion & garlic, saute until translucent. Add artichoke hearts, saute until heated through. Add heavy cream and reduce to ¾ volume or until thickened. Fold in ½ the amount of pepper jack cheese, reserving the other half for topping. Add lemon juice and spinach. Season with salt & pepper to taste. Bring to a boil and continue to cook on medium to low heat until desired thickness. Place in a nonstick Pyrex pan or chafing dish and cover with remaining cheese. Bake in 350-degree oven until golden brown.
Serve with crisp pita chips or warmly toasted baguette slices if serving as an appetizer.
Serving the Thanksgiving Meal
Thanksgiving is about family and friends so we suggest serving the meal as best suits your family. If you tend to be more casual, then by all means serve it casually – paper plates, plastic utensils, paper napkins. Today’s paper and plastic disposable products are incredibly decorative and strong – plates can withhold a loaded plate with the turkey and all the fixings and utensils now mimic regular flatware. You can opt for decorative plates with a Thanksgiving theme or the heavy duty acrylic plates. “Dress up” a casual Thanksgiving with lovely floral arrangements on the dining table and buffet table if serving buffet style and consider tying the utensils and napkin with ribbon and perhaps adding a spring of rosemary.
Is your family more formal when dining, particularly at the holidays? Then bring out the china and crystal—the plates, glasses, and serving platters and dishes! When it comes to enjoying a beautiful Thanksgiving meal, a table set with china and crystal creates a beautiful dining environment. And of course, enjoying the meal off a lovely china plate and drinking wine from a crystal wine glass truly enhances the experience. Fresh flowers are a must and be sure the flower arrangements are not so tall as to inhibit the sight of the person across the table for ease of conversation.
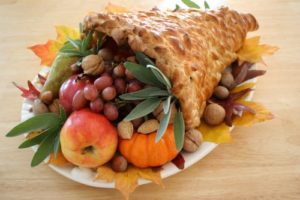
Considering a traditional centerpiece? Then a cornucopia is your choice. Known as “the horn of plenty”, the cornucopia is a symbol of wealth and abundance and is overfilled with flowers, fruits, and nuts to serve as a beautiful centerpiece.
You might want to impress your guests this year with a home-made bread cornucopia! The following instructions will show you how to make a cornucopia out of bread.
 Cornucopia Ingredients and recipe:
42oz of basic bread dough for a small cornucopia 10-12″ or 70oz for a large cornucopia 16-18″, Don’t get anything that will flake.
Rosemary or whatever herbs you want for the bread
1 Non-stick cooking spray such as Pam
Decorative edible filling such as grapes, chocolate, small fruit of choice
1 Egg
Very little water, approx. 1 tablespoon
Other Requirements
Aluminum foil to make the mold
Something to mold the aluminum foil around such as a water bottle or a large water bottle for the large cornucopia
1 Rolling pin
1 Dough knife or a knife
1 Baking sheet
Directions:
The Mold:
Take your mold item such as a water bottle and angle it because your cornucopia will be angled upwards. If you have newspaper or something similar, you can even use that to create a funnel around the bottle. Now, take the foil and start wrapping it around the bottle at an angle. This will form a cone. You will want to do this until you have a thick mold rigid enough to rest dough over without collapsing. Typically, 3-5 layers is enough. On the top opening of the cornucopia mold, fold over the edges so that it is very thick. This is going to be the heaviest part of the mold and also going to need the most strength to support the dough. Once you have a nice, thick, wide opening…you can take out the bottle and paper if you placed some inside and you can bend the “tail” of the cornucopia. Be sure to keep the foil tail pointy for easy removal later.
The Dough:
Remove the dough from the refrigerator. You’ll be kneading it and then rolling it out with a rolling pin to a square or rectangular shape. Just sprinkle herbs, cheese or whatever topper you want to bake into the cornucopia. At this point, you’ll use the rolling pin to roll it out to be about 1/2″ thick or so. Using the knife, cut 1″ strips. With the non-stick cooking spray, spray the foil mold of the cornucopia. Now take the strips and lay them over the cornucopia. Make sure to overlap it a little bit so that there are no holes or gaps once baked. Leave an inch or so clear off the top so you can take out the mold once baked. Once the cornucopia is covered, take three strips of dough and braid it together. This will decorate the edge of the cornucopia. If desired, you can even make the whole cornucopia out of braided dough.
Preheat oven to 350 degrees. In a small bowl, mix the egg and water together and then brush over the cornucopia. Once the oven is preheated, just put in the cornucopia and bake for 20-35 minutes depending on how large of a cornucopia you are making. Shield parts of your cornucopia with foil if it starts baking unevenly. Now, once finished baking, let the cornucopia rest for a bit to cool off. Once cooled enough, VERY gently remove the foil mold and fill with whatever you want. Have fun and you can decorate it additionally to fit your delicious centerpiece needs! Be creative with the fillings!
A Happy Thanksgiving From Our Family to Yours!